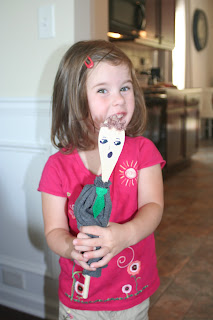
**Pictures now uploaded**
As I was looking through a book at Hobby Lobby, in search for some crafts I can do with Laney, I came across this project: making wooden spoon dolls. I wanted a craft that Laney could really participate in, a craft that wouldn't cost a ton, one that would hold her attention (quick start to finish) and lastly, one that she would play with after it was all said and done.
Here's what you need:
- Wooden Spoons (set of 4 at the Dollar Tree)
- Felt Markers
- Scrap Fabric
- Yarn
- Embroidery Thread
- Embroidery Needle
- Hot Glue Gun/Glue Sticks
- Scissors
- Optional: buttons, ribbon, pinking shears, etc..
I had Laney rummage through my scrap fabric and pick out which clothes her wooden spoon family wear. She really enjoyed this, and I enjoyed putting to use some of those scraps!
1.) Cut a small rectangle of your fabric. I used around 12" x 5". All four of my spoons were different sizes, perfect for creating a family of four, so your fabric might be larger for the bigger spoon and smaller for the smaller spoon.
2.) Thread your embroidery thread and hand sew a running stitch around the longer side of your fabric rectangle. I used this time teach Laney what a running stitch was and wanted to use the correct sewing lingo so I could slowly teach her the basics of sewing. Pull the needle through in the end, gather the fabric together tightly, wrap around "neck" of your doll and tie it closed. Laney enjoyed pulling the needle through, and learned from Mommy's outcries that the needle tip is sharp. Feel free to put a dab of your hot glue to keep it in place. I tied my and it seems fine. If you want to make several outfits for your wooden spoon doll/puppet, I would recommend not hot gluing it.


3.) Draw a face on your doll. When Laney drew her face on her doll, it really didn't look like a happy doll, but that was her little creation, and I wanted her to know I was pleased with her drawing. I helped her draw lips and showed her how to put eye lashes on the eyes.

4.) Hot Glue the hair on with either yarn or embroidery floss. Yarn is better, but I didn't have any on hand, so I used embroidery floss since I had a wide selection of colors.
5.) Laney picked out three of her favorite buttons to put on her doll, and I sewed them on for her. I think she was her favorite part!
6.) Then she ran and showed Daddy and Mattie her Wooden Spoon Laney doll!!


3 comments:
What a fun idea! I want to see your wooden spoon doll so badly, but I can't get the link to the picture to work!
Hollie! HOW cute are those?!?!?! I love them! I foresee a rainy day activity coming up!
I think what would be even more cute would be to print off a picture of every family member's face and glue it to the spoon. I think it would be hilarious!
Post a Comment